Halloween is considered one of the best holidays of the year for most of our little ones. It is the day that they can dress up as their favorite characters and go trick-or-treating around their neighborhood.
For children with autism, however, Halloween may not be that fun after all, since most children with autism do not understand the concept of pretend-play or make-believe. Thus, asking them to wear a Halloween costume made up of a rough fabric or accessories that they are not used to wearing becomes problematic.
Therefore, for this Halloween, we have come up with different arts and crafts ideas as well as simple recipes that you can create with your child during this holiday. After all, Halloween is a traditional holiday that you want your child to enjoy too.
Below, you will find spooky ideas that you can do at the comfort of your home with your child.
Arts & Crafts:
-Paper Candy Corn: Simple and fun activity for the kids!
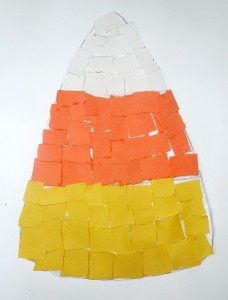 Materials: White Cardstock sheet; White, Yellow, and Orange Contruction Paper, Black marker, Scissors, and Glue.
How to do it:
1) Draw an outline of a piece of candy corn with the black marker on the white cardstock.
2) Draw the lines that separate the different colors.
3) Give your child strips of the white, yellow, and orange construction papers for them to cut into small squares.
4) Put glue on each section of the candy corn outline and have your child glue the different squares.
The finished product should look like our picture above. If your child loves this activity too much, you can make other Halloween items like a pumpkin or a ghost.
-Handprint Spiders and Ghosts: Make beautiful spiders and ghosts with your child’s handprints.
How to do Spiders:
1) Paint your child’s left hand (excluding the thumb) with the black paint and place it on the white paper.
2) Repeat Step 1 with the right hand.
3) Once dry, paint the spider’s eyes and mouth.
4) Cut out your child’s spider and apply the string behind it so that you can hang it wherever you desire.
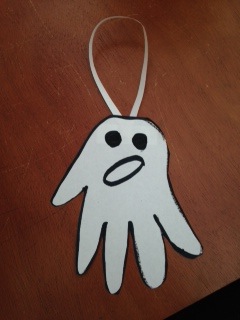
How to do Ghosts:
1) Paint your child’s hand with white paint.
2) Place your child’s painted handprint on the black paper and wait for it to dry.
3) Apply black paint on a paintbrush and paint the ghost’s eyes and mouth with the black paint. 4) Once dry, cut out your child’s handprint ghost and apply the string behind it so that you can hang it wherever you desire.
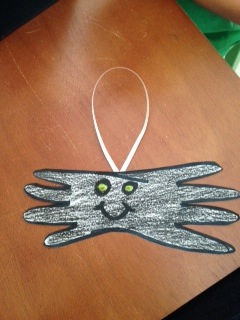
-Skeleton Hand: Make beautiful skeletons too with your child’s handprints.
 Materials: Black construction paper, white paint & paintbrush, cottom swabs/q-tips, glue, and scissors.
How to do the Skeleton Hand:
1) Paint your child’s hand and wrist with the white paint.
2) Immediately place painted hand on the black construction paper.
3) Place glue on each finger, hand, and wrist.
4) Have your child glue the Q-tips where you put glue and you should have your skeleton hand!
-Paper Plate Witch: Simple and fun paper plate witch!
Materials: White paper plate, green paint & a paintbrush, black and orange construction paper, yarn, wiggly eyes, glue & scissors.
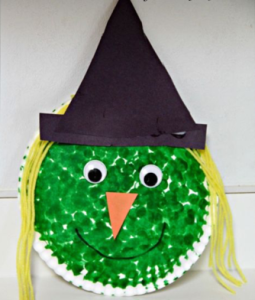 How to do the paper plate witch:
1) Paint the paper plate with the green paint. Let air dry.
2) Cut the triangle (with the black construction paper) for the hat and the nose.
3) Place the wiggly eyes and the yarn (for the hair).
4) Have your child glue the hat & nose.
5) Make a smile and boo- you’ve finished your paper plate witch!
-Paper roll Mummies:
Materials: Toilet paper roll, toilet paper, glue & scissors, and wiggly eyes.
 How to do the mummies:
1) Have your child put glue on the toilet paper roll.
2) Start covering the roll with pieces of toilet paper.
3) Once covered, cut out the arms and paste them on the sides.
4) Place the wiggly eyes.
*You can hang them from the ceiling or just place them around your house.
*You can do the same to create beautiful pumpkins, witches, skeletons, or any inspired Halloween craft. Handprints are just a great way for us to look back and see how the kids have grown through the years. Just remember to always have fun!
HALLOWEEN RECIPES:
-Frankenstein Pudding Cups: A simple recipe that makes a great addition to your party and creativity!
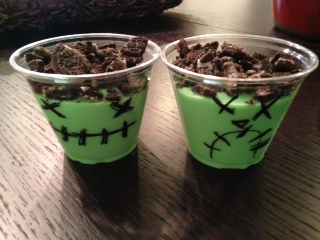
How to make it: (Approx. time: 10 minutes)
1) Using the black sharpie, have your child decorate the outside of the cups with “Frankenstein’s face” (as shown on the picture).
2) Mix vanilla pudding as directed, adding in 5-9 drops of green food coloring – to your liking.
3) Add about 1 cup of green pudding to each cup before it sets.
4) Put in the refrigerator.
5) When pudding is ready and before serving, add crushed Oreo cookies on top to create “Frankenstein’s hair”.
6) Enjoy!
– Orange Witches’ Punch: Add a festive touch with this tasty drink by serving it in a glass pumpkin bowl.
Ingredients: 1 package (6 ounces) orange gelatin, 1/2 to 1 cup sugar, 2 cups boiling water, 1 can (46 ounces) apricot nectar, 1 can (46 ounces) pineapple juice, 3/4 cup lemon juice, 4 liters ginger ale, chilled
How to make it: (Approx. time: 10 minutes)
1) In a large bowl, dissolve gelatin and sugar in water.
2) Stir in the apricot nectar, pineapple juice, and lemon juice.
3) Freeze in two 2-quart freezer containers (Remove from the freezer 2-3 hours before serving)
4) Place contents of one container in a punch bowl; mash with potato masher. Stir in ginger ale just before serving.
Also, make sure to check our other blog post titled: “Getting ready for Halloween“ to see our helpful tips about Halloween costumes.